
Travel photography allows you to capture unforgettable moments and create visual memories from your adventures. Whether you’re photographing landscapes, humans or movements, these tips will help you take great photos that stand out.
>>Kickstart practicing with participating in one of our PHOTOGRAPHY TOUR PROGRAMS!
1. Get to Know Your Camera and Equipment Before You Travel
Before you head out on your trip, take time to get familiar with your camera or smartphone. Learn how to adjust settings like aperture, shutter speed, and ISO to improve the quality of your shots.
>>CHECK OUT OUR PHOTOGRAPHY WORKSHOP TO MOROCCO
Familiarizing yourself with your camera’s built-in flash is also important, especially in low-light conditions. Experiment with both manual and automatic mode to understand how your equipment works and optimize it for different scenes. This will help you take better photos quickly, without relying too much on trial and error.
2. Understand the Different Camera Orientations for Better Shots
Different orientations can make a huge impact on your photos:
- Portrait (Vertical) is great for close-up shots or individual subjects such as a person or a tree.
- Landscape (Horizontal) is perfect for capturing expansive views or group photos. This orientation works well when the scene involves horizontal lines or wider compositions.These wider images from the Pura Vida program capture joy amid a busy service scene and postcard-perfect scenery in northern Costa Rica.


3. Pay Attention to Lighting for Better Photos
Lighting is key when taking pictures. The best light for most photos comes during the golden hour, which is shortly after sunrise or before sunset. Avoid midday sun as it can create harsh shadows.
To create drama, position your subject against strong light sources to cast shadows or create silhouettes. Flash can be used for certain creative effects but be mindful of not overusing it, as it can cause distracting backgrounds.
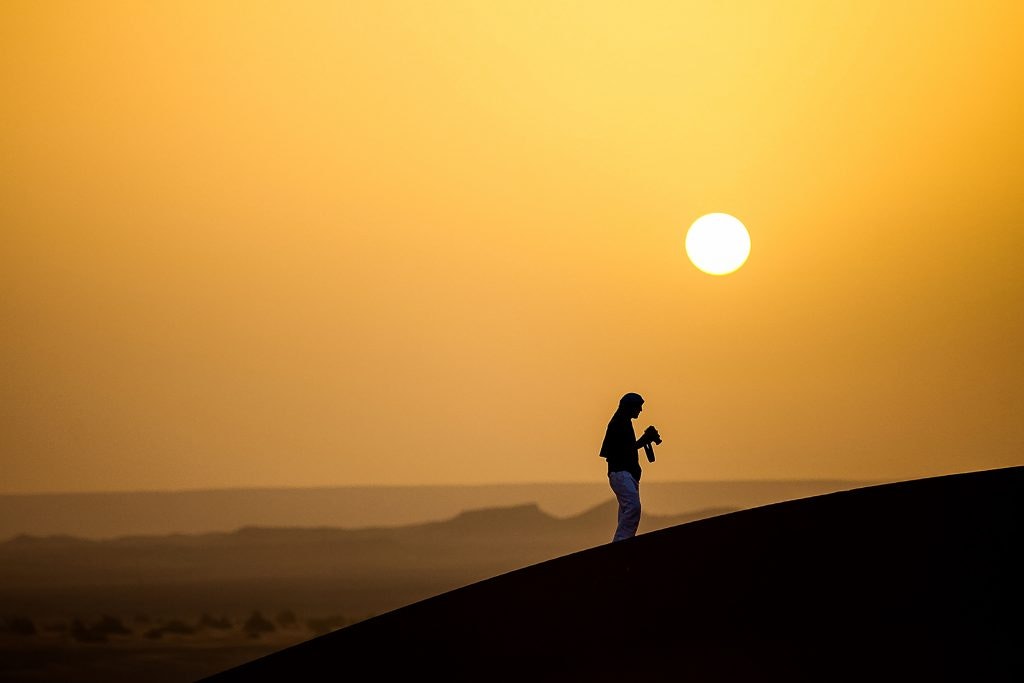
In most pictures, particularly posed photos of people, the sun shouldn’t be behind the people you are capturing or behind you if you’re taking a selfie. Exceptions may include if you want something in silhouette like this photo from Rustic’s Surf and Service program in Costa Rica.

Or this image from the Moroccan Wanderer program
It’s also more challenging to take amazing travel photos when the sun is directly overhead since subjects often look better in soft light. But don’t let that stop you from trying it if something interesting is happening mid-day.
4. Learn Composition Techniques to Improve Your Travel Photos
Composition is the backbone of every great photo. Consider these basic principles when framing your shot:
- The rule of thirds helps you position your main subject off-center, creating a more engaging photo. Using four points in the frame, like two vertical lines and two horizontal lines, can guide the human eye naturally across the image.

- Negative space—empty areas in your frame—helps emphasize the subject. This is an excellent technique for creating a more striking and balanced photo. In addition, make sure you pay attention to the area surrounding your main subject to ensure there’s no visual clutter.
- Head room is a common consideration for videographers who are capturing interviews with people, but it also applies to photography.
When you’re taking posed photos of people, in many cases you want to frame the shot so there’s a little room above people’s heads, but not too much. It’s usually not great to cut people’s heads out of the frame. Exceptions include super close-up photos, which can be dramatic if the person has an interesting facial expression. This photo from the Intro to Community Service program in Fiji has good headroom. Along with an effective blurring of the background
5. Simplify Your Shots for More Focused Photos
Avoid cluttering your photo with too many elements. Focus on the subject and keep the background simple to allow it to shine. Zoom in to capture finer details and start shooting when you see a moment unfolding. The fewer distractions, the stronger the impact of the picture.
6. Take Multiple Shots to Increase Your Chances of Getting the Perfect Photo
When shooting, always take multiple shots to ensure you capture the best moment. This is especially helpful for action shots or moments where timing is crucial.
Most people make the mistake of taking just one shot, but in reality, taking several increases your chances of getting a good photo. Experiment with different compositions and angles for variety.
7. Stabilize Your Camera to Avoid Blurriness
To prevent blurry photos, make sure your camera is stable. Use both hands to hold it steady or use a tripod to eliminate camera shake. If you’re using long shutter speeds or long exposures, this is especially important to get a clear, sharp image.
For low light or night photography, consider using the timer or remote shutter to avoid any accidental shake when pressing the shutter button.
8. Use Lines and Angles to Guide the Viewer’s Eye
Incorporating lines in your composition can create depth and draw the viewer’s attention. Lines intersect in the photo to direct the human eye toward the subject. Look for natural lines like roads, rivers, or buildings, and use them to frame your subject. This helps create more dynamic and visually pleasing images.


9. Capture Creative Perspectives to Make Your Photos Stand Out
Changing your perspective can give your photos a fresh, creative look. Take shots from above, below, or different angles to create more interest. A professional photographer often uses unconventional perspectives to make photos stand out. Experiment with shooting from low to high or high to low to add depth to the scene.
An example is this photo from the Hanoi to Ha Long program that was taken by a photographer standing close to these buildings and looking up

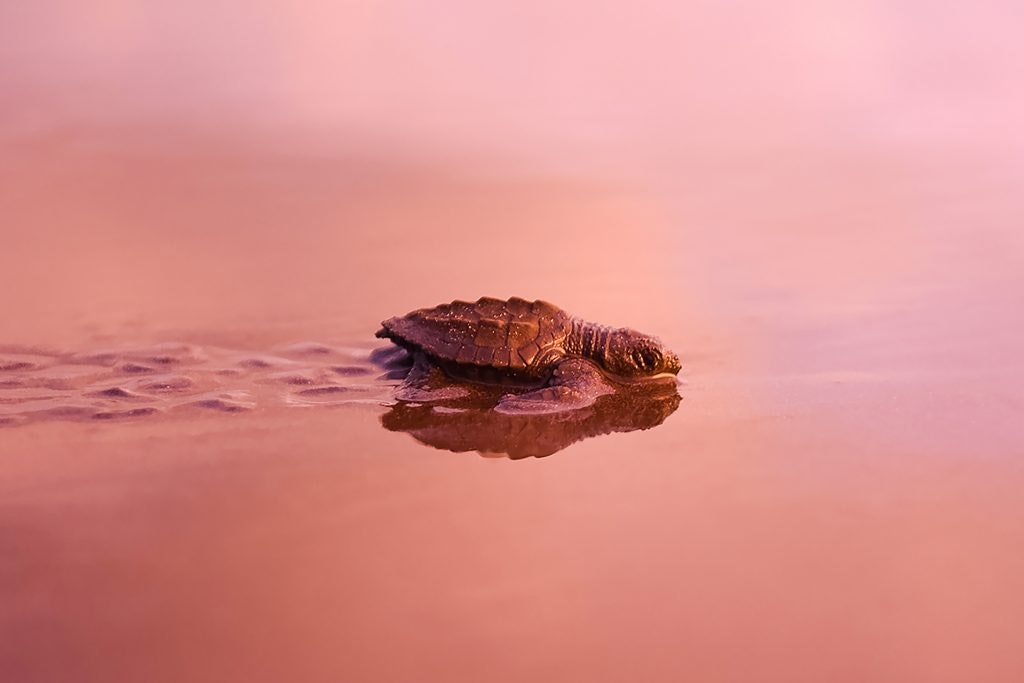
10. Experiment with Reflections to Add Visual Interest
Reflections can create stunning visual effects. Look for reflective surfaces such as water, mirrors, or windows to add symmetry and intrigue to your images.
Photographers use this technique to enhance their photos with layers and texture. Be mindful of how the reflection may alter the original picture.
Here is a photo utilizing reflecition technique for the Turtle Conservation Project in Costa Rica
11. Use Shutter Speed and Long Exposures for Motion Effects
Long shutter speeds or long exposures are perfect for capturing motion, such as flowing water or light trails. This technique can turn ordinary scenes into mesmerizing photographs.
For example, try photographing waterfalls with long exposures to give the water a silky-smooth effect. A neutral density filter can help when shooting in bright sunlight by allowing you to use long exposures without overexposing the image.
12. Create Silhouettes and Play with Shadows
Silhouettes and shadows can add mystery and drama to your photos. Position your subject against a bright light source, like the setting sun, to create a striking silhouette.
Play with shadows to create dramatic contrasts and deepen the mood of your photo. These effects are especially powerful when using the golden hour lighting.
13. Share Your Photos and Get Inspired by Others
Once you’ve taken your best shots, consider sharing them online. Photo contests can provide great motivation, and you can find inspiration by following travel photographers on social media.
Rustic Pathways hosts photo contests where you can submit your travel shots for a chance to win prizes. View other photographers’ submissions for creative ideas and get feedback to improve your skills.
By following these tips, you’ll be well on your way to taking amazing travel photos that capture the beauty and essence of your travels.
Whether you’re snapping a photo of a landscape or a portrait, these photography techniques will help you improve your skills and feel confident in your ability to capture great photos 📸!